Libcode Libcode

  • Home
  • LibCode Index
  • Contact
Home / 05 Data Entry / 05.03 Editing Resource Information

05.03 Editing Resource Information

At some stage you will need to change the information entered for a resource, be it a data entry mistake or just adding additional subject headings and barcodes. Changing is Editing.

Load the LibCode Suite icon and go into Data Entry module – This screen will appear:

Arrow

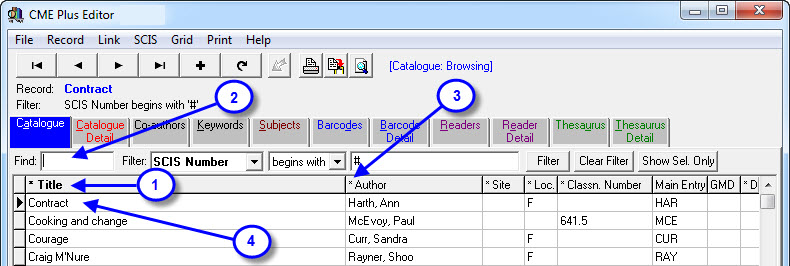
  1. Data is displayed in the order of selected column (Title has a * which means it is click sortable and the fact that it is bold means it is the current active sort).
  2. The Find box is a ‘begins with’ search of the sorted column (it searches the Bold column).
  3. The * next to Author indicates it is one of the sortable columns.  A click on the top of the Author column would change the current sort to Author.
  4. When locating a resource using the Find Option, the title highlighted in bold with the ▶ beside it is the closest possible match to your entered data.

Find the record you need to change and either double click on it, press <enter>, click on the Cat Detail screen tab or hold down <Alt> and press <C> for Cat Detail (there are several ways to do it…up to you!) and the Cat Detail screen appears ready for you to make whatever changes are necessary…

Sortable columns and the Find box is an easy way to find a record but there is another way…

Filters…Another way to find resource information (Especially useful for groups of resources which may all need attention).

The Data Entry > Catalogue screen tab contains a Filter function which allows you to select a group of records (or one record if you are very specific) by choosing a field and setting criterion (being the singular term for the plural word Criteria…apparently!).

For Example…

Arrow

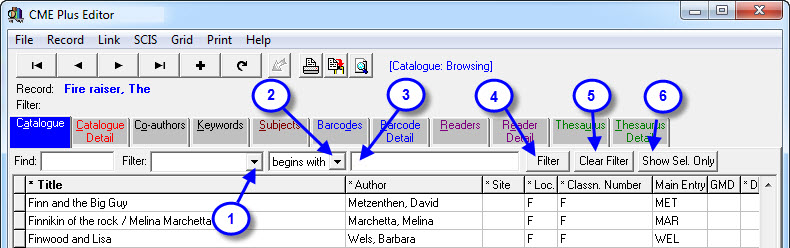
  1.  Select the field you wish to use as a Filter from a list displayed when you click the little down arrow to the right of the Filter: box.
  2. Select the search operator from this drop down (begins with, equal to, >= greater than or equal to, <= less than or equal to).
  3. Enter the first part (or total detail) of the search string you would like to use.
  4. Click the Filter button and only the records which fit your description will be displayed (It is still possible to use the click sort columns and Find box to locate records within the filtered group if a particularly large list is displayed).
  5. Don’t forget to click the Clear Filter button when you have finished or you will not be able to see any records outside the list determined by the set Filter… bit of a trap for beginners!

 Note:

  • When the matching records are displayed you can selectively highlight only those records that you’re interested in by holding down the CTRL and clicking on each resource with the left mouse button.
  • Once all of the desired resources are highlighted click on the 6. Show Sel. button this will remove the unwanted resources from the list so you can then go ahead and print or move through a specific list of resources that need attention.


change recordsedit dataedit recordediting recordsediting resource dataediting resources 05 Data Entry

Related Articles

  • 05. Data Entry
  • 05.01 Adding a New Resource
  • 05.01.01 Cataloguing Specific Resources
  • 05.01.02 Adding Multiple Barcodes to a Resource

Categories

  • 1301 Overview
  • 901.03 The Modules
  • 702 Getting Started
  • 103 LibCode Suite Menu
  • 704 Enquiry
  • 1605 Data Entry
  • 305.03 Editing Resource
  • 305.01 Adding a New Resource
  • 405.09 Linking resources
  • 205.10 Adding to the Thesaurus
  • 106 Finding a Classification Number
  • 1507 Circulation
  • 307.06 Extending Loans
  • 407.07 Reports
  • 107.08 Reservations
  • 407.13 Borrowers
  • 007.14 Groups
  • 507.07.04 Returned Loans
  • 207.07.05 Unreturned Loans
  • 1108 Utilities
  • 308.01 Inload-Outload
  • 708.02 Backup-Restore
  • 1108.06 Updating
  • 1008.07 Reports
  • 908.08 Setup
  • 508.06.01 Catalogue
  • 108.06.02 Barcode Record Bulk Updating
  • 808.06.06 Updating Circulation
  • 608.06.06.08 Synchronising Borrowers and Rolling Over Student Data
  • 208.06.07 Culling Records
  • 508.08.01 Authority Files
  • 508.08.03 Circulation Options
  • 408.08.03.01 Loan Period, Loan Extensions & Due Date Overview
  • 109 Junior HYG (Optional)
  • 1810 Stocktake
  • 511 SCIS & CMEWeb Uploads
  • 512 Regular Tasks
  • 213 Support Options
  • 814 Installation, Upgrades, etc

Most Viewed

  • 08.06.06.08.06 Using the Dynamic Student Report (EQ Schools using Version 7) 308
  • 02.03 Installation Requirements for the Libcode Suite 276
  • 01 Overview – LibCode 6.7.9.0 267
  • 02.02 Methods of Installation 218
  • 02.04 Setting up – Customising LibCode Suite 200

Social

Article Categories

01 Overview (13) 01.03 The Modules (9) 02 Getting Started (7) 03 LibCode Suite Menu (1) 04 Enquiry (7) 05 Data Entry (16) 05.01 Adding a New Resource (3) 05.03 Editing Resource (3) 05.09 Linking resources (4) 05.10 Adding to the Thesaurus (2) 06 Finding a Classification Number (1) 07 Circulation (15) 07.06 Extending Loans (3) 07.07 Reports (4) 07.07.04 Returned Loans (5) 07.07.05 Unreturned Loans (2) 07.08 Reservations (1) 07.13 Borrowers (4) 08 Utilities (11) 08.01 Inload-Outload (3) 08.02 Backup-Restore (7) 08.06 Updating (11) 08.06.01 Catalogue (5) 08.06.02 Barcode Record Bulk Updating (1) 08.06.06 Updating Circulation (8) 08.06.06.08 Synchronising Borrowers and Rolling Over Student Data (6) 08.06.07 Culling Records (2) 08.07 Reports (10) 08.08 Setup (9) 08.08.01 Authority Files (5) 08.08.03 Circulation Options (5) 08.08.03.01 Loan Period, Loan Extensions & Due Date Overview (4) 09 Junior HYG (Optional) (1) 10 Stocktake (18) 11 SCIS & CMEWeb Uploads (5) 12 Regular Tasks (5) 13 Support Options (2) 14 Installation, Upgrades, etc (8)

Libcode

Knowledge Base, Frequently Asked Questions, forums integration and much much more.

Flatbase by NiceThemes © 2025. — Powered by WordPress.