Libcode Libcode

  • Home
  • LibCode Index
  • Contact
Home / 05 Data Entry / 05.12 Grid Layout Options

05.12 Grid Layout Options

Grid Layout Options allow you to save a specific screen layout for future use.  This comes in handy if you continually need to go back to a certain layout that you use for a special report or for cleaning up / checking data.

Example:

To view a list of resources showing the Series beside the Title (to clean up the Series details):

  1. Load Data Entry and scroll across to the right until you can see the Series column.
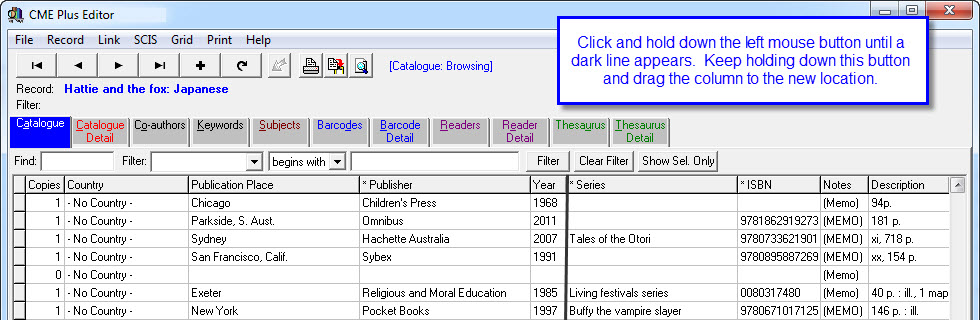
  2. Click on the top of this column with the left button of the mouse and hold it down.
  3. Drag this column to the preferred position on the screen eg beside the Title column. Arrow
  4. You can change the width of columns by dragging the right column header border with your mouse.
  5. Once you have the desired layout click on the Grid button then Save Configuration.
  6. The browser pop up screen appears and displays the CMEPlus folder.  This is where this configuration should be saved… all you need to do is give your new configuration a relevant name eg Resources by Series and click Save.
  7. Each time you open the Data Entry module a standard data layout is presented.  To load one of your  special layouts click on Grid in the bar menu, select the load layout name you saved previously.
  8. If you want to return to the regular screen layout you can either go to Grid and Restore Defaults (Ctrl + F7) or close and then re-open the Data Entry module.

Hints / Notes:

  • Any column with a * in the heading can be click sorted.
  • Don’t forget to check out the Report Generator function built into this screen.  This allows you to produce basic reports from this screen which is very handy once you’re familiar with how they work.
  • If you are checking data it’s a good idea to have the column/s you are checking at the front of the list and check as few details as possible in one run through the data… it’ll save your eyes and be faster in the long run.
  • If you double click on a field in the data display grid the Cat. Detail screen will appear with the cursor already in the double clicked field ready for you to make changes.

Tags: configuration, configure grid, grid layout options, save grid configuration

05 Data Entry

Related Articles

  • 05. Data Entry
  • 05.01 Adding a New Resource
  • 05.01.01 Cataloguing Specific Resources
  • 05.01.02 Adding Multiple Barcodes to a Resource

Categories

  • 1301 Overview
  • 901.03 The Modules
  • 702 Getting Started
  • 103 LibCode Suite Menu
  • 704 Enquiry
  • 1605 Data Entry
  • 305.03 Editing Resource
  • 305.01 Adding a New Resource
  • 405.09 Linking resources
  • 205.10 Adding to the Thesaurus
  • 106 Finding a Classification Number
  • 1507 Circulation
  • 307.06 Extending Loans
  • 407.07 Reports
  • 107.08 Reservations
  • 407.13 Borrowers
  • 007.14 Groups
  • 507.07.04 Returned Loans
  • 207.07.05 Unreturned Loans
  • 1108 Utilities
  • 308.01 Inload-Outload
  • 708.02 Backup-Restore
  • 1108.06 Updating
  • 1008.07 Reports
  • 908.08 Setup
  • 508.06.01 Catalogue
  • 108.06.02 Barcode Record Bulk Updating
  • 808.06.06 Updating Circulation
  • 608.06.06.08 Synchronising Borrowers and Rolling Over Student Data
  • 208.06.07 Culling Records
  • 508.08.01 Authority Files
  • 508.08.03 Circulation Options
  • 408.08.03.01 Loan Period, Loan Extensions & Due Date Overview
  • 109 Junior HYG (Optional)
  • 1810 Stocktake
  • 511 SCIS & CMEWeb Uploads
  • 512 Regular Tasks
  • 213 Support Options
  • 814 Installation, Upgrades, etc

Most Viewed

  • 02.03 Installation Requirements for the Libcode Suite 267
  • 01 Overview – LibCode 6.7.9.0 255
  • 02.02 Methods of Installation 204
  • 02. Getting Started 189
  • 08.06.06.08.06 Using the Dynamic Student Report (EQ Schools using Version 7) 177

Social

Article Categories

01 Overview (13) 01.03 The Modules (9) 02 Getting Started (7) 03 LibCode Suite Menu (1) 04 Enquiry (7) 05 Data Entry (16) 05.01 Adding a New Resource (3) 05.03 Editing Resource (3) 05.09 Linking resources (4) 05.10 Adding to the Thesaurus (2) 06 Finding a Classification Number (1) 07 Circulation (15) 07.06 Extending Loans (3) 07.07 Reports (4) 07.07.04 Returned Loans (5) 07.07.05 Unreturned Loans (2) 07.08 Reservations (1) 07.13 Borrowers (4) 08 Utilities (11) 08.01 Inload-Outload (3) 08.02 Backup-Restore (7) 08.06 Updating (11) 08.06.01 Catalogue (5) 08.06.02 Barcode Record Bulk Updating (1) 08.06.06 Updating Circulation (8) 08.06.06.08 Synchronising Borrowers and Rolling Over Student Data (6) 08.06.07 Culling Records (2) 08.07 Reports (10) 08.08 Setup (9) 08.08.01 Authority Files (5) 08.08.03 Circulation Options (5) 08.08.03.01 Loan Period, Loan Extensions & Due Date Overview (4) 09 Junior HYG (Optional) (1) 10 Stocktake (18) 11 SCIS & CMEWeb Uploads (5) 12 Regular Tasks (5) 13 Support Options (2) 14 Installation, Upgrades, etc (8)

Libcode

Knowledge Base, Frequently Asked Questions, forums integration and much much more.

Flatbase by NiceThemes © 2025. — Powered by WordPress.