Restoring data from a backup…
Restoring data can be done for a number of reasons to:
- Update LibCode Suite with newly converted data provided by LibCode Library Systems.
- Add to the catalogue database when using a non-networked computer for cataloguing.
- Restore data from previous backups after data corruption or other problem.
Restoring Data…
- To restore data from a backup folder you will need to make sure of the date the backup was done.
- Locate the backup you wish to restore from using Explorer.
- Check the modification dates on the .DBF files, this is the date the backup was done.
- If you can only see lots of icons, go to the top of the screen and click on View and select Details. This will list the file name, type and modification date.
- When you’re confident that this is the data you want to restore, open up Utilities > Backup-Restore > Restore.
- You’re now given the opportunity to select the data you wish to restore, All, Catalogue Only or Circulation Only. In this example we have selected All.
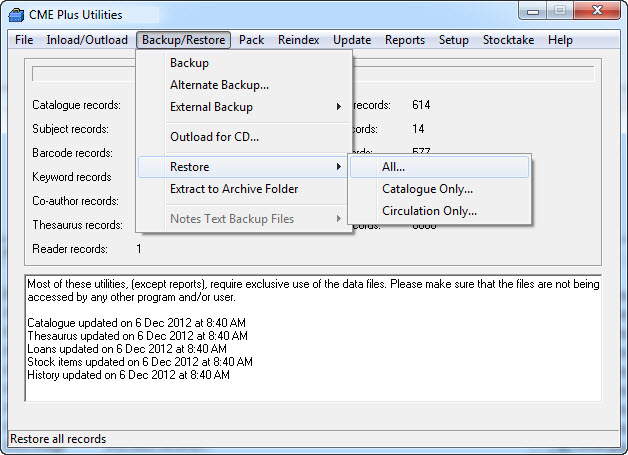
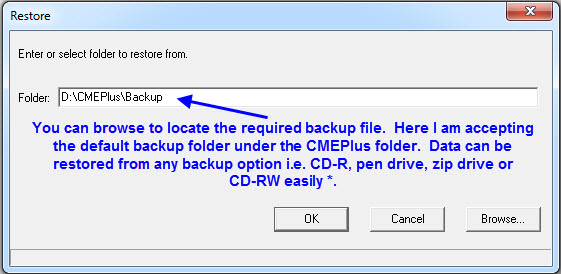
- The next screen allows you to select the location of the backup you would like to restore from.
* If the backup required is on a Server Tape backup it will be necessary to involve your IT Person in the restoration procedure. This is not an ideal situation as a lot of organisations only receive infrequent visits from IT Technicians, resulting in the inability to function until they arrive on-site.
Restoring All Data…
This will restore both the catalogue and the circulation data to the same point in time (the date of the backup).
Restoring Catalogue only…
This will restore only the catalogue data
- Normally this option is taken when the cataloguing of resources is done at another location not on the network.
- The data is backed up and a restore catalogue only is done to update the satellite catalogue data without changing the Circulation info on the machine.
Restoring Circulation only…
- If there is a problem with the Circulation database and the Catalogue is still fine it is possible to restore Circulation from a backup without touching the catalogue data from one machine to another using this option. It can be a little tricky, but once you have done it a couple of times you will find it useful.
Re-installing LibCode from a Backup CD-R with CMEPlus folder on it –
If you have had a system crash or need to move the LibCode Suite from one hard drive to another it is very easy to do.
If you have a CD-R you’ve burnt that contains either the:
- CMEPLUS folder and/or its contents,
OR
- CMESAFE folder and/or its contents.
You are seconds away from being back up and running.
Restoring from CD-R with CMEPlus folder on it:
- Place CD into drive and right-click on My Computer or the START button.
- Click Explore (may need a network admin to help you on this…).
- Click on the CD drive in the left list.
- Right click the CMEPlus folder in the right hand list and click Copy.
- Find the C: drive (Local Hard Drive) on the left hand list, Right click on it then click Paste.
- Once the copy operation is complete, you might need to change the file attributes on the folder and its contents… Right click on the new CMEPlus folder on the C:/ Drive and then click Properties.
- If there is a tick in the Read Only box, untick it and click Apply. If you get an option to apply the changes to All files and subfolders take that option…
(To check that Read Only attribute has been changed, double click the CMEPlus folder then click on one of the files, press Ctrl-A (to Select All), right click on one of the highlighted files and click Properties… the Read Only box should not be ticked.) - All you need to do now is create your icons and you are off and racing!
If you don’t have a CMEPlus folder on the CD you’ll need to make a folder on the Local Hard Drive before you copy the files from the CD.
- Find the Local C:/ Drive and double click.
- Right click on the right hand side window and click New then Folder and call it CMEPlus.
- When you click on the CD Drive you’ll see a bunch of files and folders… just click on one of them then press Ctrl-A (Select all) then right click one of them and click copy… you then need to right click on the CMEPLus folder on the C:/ drive and Paste to copy the files.
- Change the Read Only attribute of the files as in Step 6 from the above list.
Any problems or questions… please call the LibCode Office (07) 4638 9025