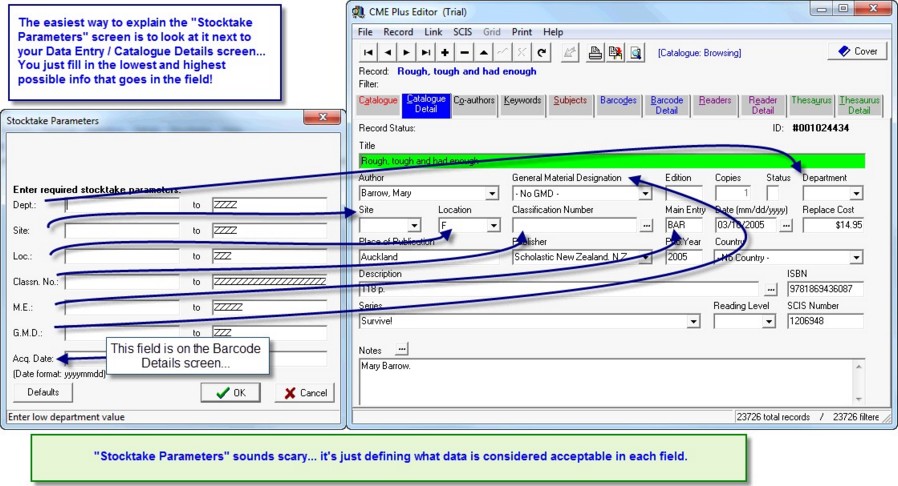
During stocktake you need to set Stocktake Parameters. This can be a little daunting the first few times so here is an explanation of the Stocktake Parameters screen… The Parameters screen is on the left and the Data Entry screen is on the right.
A Special Note:
The Stocktake Parameters set in Step 2 are only for visual comparison of the data you have scanned… to… the existing catalogue of resources. This screen has been included so you can check your data entry consistency so it does not matter if you don’t get it right the first time. IF everything turns up RED then you might need to have another go!
Each field on this screen allows you to set a Range of possible values… Low Value to High Value. Lets look at the Site displayed on the screen shot above as an example…
Site: ’ ’ to ZZZZ means Site should be anything between Blank and ZZZZ (which is the highest possible value for a Site field entry) so this describes ALL resources. If you put Site: SCI to SCI then the Site must be equal to SCI for the record to NOT appear RED… make any sense?
Just go ahead and set some crazy parameters and see what happens… the best way to understand these settings is to experiment!
An explanation of each field is included here…
DataTime: (Only displayed when you are about to VIEW the scanned items…)
This field allows you to view a certain time span of your stocktaking activities (defaults to the Date/Time of the first item you zapped to the Date/Time of the last item zapped). For Example… you were stocktaking the Fiction section between 1pm on the 13th of September, 2010 and 3pm on the 13th of September, 2010… (Format is Year, Month, Day, Hour, Minutes, Seconds)
So the Date/Time entries would be 20100913130000 to 20100913150000
(yyyymmddhhmmss) (yyyymmddhhmmss)
Site:
The Site describes possible value that the Site field should be for the catalogue records you are stocktaking… ’ ’ to ZZZZ as shown above means the Site can be anything. For Fiction books it would probably be Site: ’ ’ to ’ ’ (which means it must be blank).
Loc:
Loc describes the possible value of the Location field should be for the resources you wish to view. Fiction books would probably be Loc: F to F (which means Loc must be ‘F’).
Classn. No.:
The Classn. No. sets the possible value that the Dewey Number field should be for the catalogue records you want test. Fiction books would probably be Dewey no. : ’ ’ to ’ ‘.
M.E.:
The Main Entry is the three (can be up to 5) letters that appear on the spine label. This entry describes the possible values the spine labels of resources you are checking should be. Fiction books would probably be M.E.: A to ZZZZZ (which means ALL… although you could split up the fiction section by using… A to AZZZZ which would only be the A fiction resources…)
GMD:
General Material Designation (or Description) describes what should be in the GMD field for the resources you are checking. Fiction books should probably be GMD: ’ ’ to ’ ‘.
Acq Date:
The Acquisition Date describes what should be in this field for the resources you are checking. You would usually leave this set as is, which describes all resources purchased up to the day you started zapping items for the stocktake. It is set so that if you enter new resources during the Stocktake process you don’t need to remember to stocktake them!
Defaults button:
This is the ‘I am a little confused’ button. It resets the values of all the settings on the screen to include ALL records in the catalogue. This is a good place to start the Stocktake Parameters setting process. Then you move through the items asking yourself… ‘Now what should this field contain for the items I have just zapped?’