Tool bars and Shortcuts
A number of tool bars and shortcut keys have been incorporated into the LibCode Suite to speed up various processes and assist in database management. Throughout this guide you will be shown a number of specific shortcut keys to use during specific tasks. The availability of functions and shortcuts varies depending on the screen you’re working with. As you can see from the list below shortcuts are mentioned beside functions in drop down lists and also usually presented in the pop-up tool tip that is displayed when you point to a button.
The Bar Menu…
- Common to all Windows applications
- Contains lots of shortcuts (and corresponding shortcut keys) to various functions
- Each module has a slightly different bar menu
- Well worth browsing through all the bar menus when you get new software or install an upgrade to see if there are new functions you knew nothing about!
Record Drop Down Menu…
- The record bar menu contains a number of functions as it lists all the things you can do to, or get from a record
- Again, it is worth taking a good look for shortcut keys and functions you might not have been aware of previously

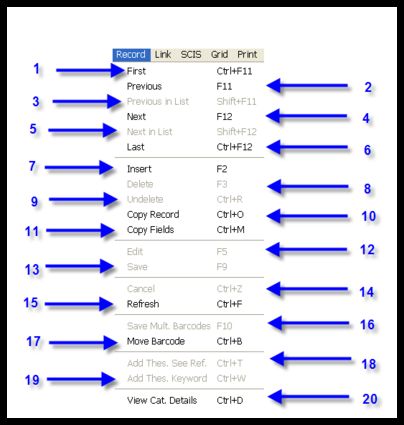
First (Ctrl+F11) – Jumps you to the first record in a filtered list. For example, If you set a filter on the Data Entry grid of Author begins with ‘A’ then press Ctrl+F11 you would jump to the first record in the list.
Previous (F11) – Goes to previous record in a filtered list. See Next (F12) description only this would assume you have started at the end of the list and are working backwards.
Previous in list (Shift+F11) – Jumps to the next record in the list prior to saving the changed record you just edited.
Next (F12) – Goes to next record in a filtered list. For example, you have set a filter for Author begins with ‘A’ and you have discovered several items that need adjusting (but there is not enough to justify a bulk update )… after editing the first record you will be sitting in the Author field of the fixed record and an F12 – Next will save your changes and take you to the Author field of the next record. Saves time!
Next in List (Shift+F12) – Same idea as Previous in List only this goes to the next record… probably more commonly used than the Previous in list function. These Shift+ F11/F12 functions are great for cleaning up data using the column layout and sorts on the display grid in Data Entry… test them out after editing and saving a record and you think to yourself… “gee I wish I could go back to the next record in the list that was after this record before it moved!”… that’s what they do!
Last (Ctrl+F12) – Jumps you to the last record in a filtered list (See First example).
Insert (or Add) (F2) – Is the same as clicking the + button. Depending on the screen this option will add a new item/record.
Delete (F3) – Is the same as clicking the – button, it marks a record for deletion. The record is not actually deleted from the database until a Backup or Pack is done meaning you can change your mind before the end of the day!
Undelete (Ctrl+R) – Changing your mind about deleting a record… can only be done before a Backup or Pack is done.
Copy Record (Ctrl+O) – Makes a duplicate record so you can adjust details for a new entry. This is not for multiple copies of a resource… it should only be used if a copy of a resource is to be stored in a different shelf location. eg. three copies of the Diary of Anne Frank could be shelved in three different places to encourage readers… Fiction, Diaries, History which would warrant three different catalogue entries. Copy Record Ctrl+O makes this nice and easy. Look up the original entry on the Catalogue tab then go into Cat. Detail tab and press Ctrl+O to make a copy of the current record as a new entry.
Copy Fields (Ctrl+M) – Stores the information contained in each field in the currently displayed record so you can call it up from a new Data Entry screen to save re-typing the same details. For example. you are entering several resources in the same series… they are written by the same Author, have the same Publisher, Publication Date, Site, Location, Dewey, Main Entry. You can look up an existing record from that series on the Catalogue tab then go to the Cat. Details tab, press Ctrl+M to remember the details. After clicking the + button (or pressing F2) to add a new record, you can press F4 to recall the details for the field you are in from the remembered record. This F4 – ‘call up remembered details’ function is automatically available during the normal data entry process. The Copy Fields function is a way to ‘prime’ the F4 with details.
Edit (F5) – Not necessary to press F5 to make changes, just clicking in a field automatically activates the Record Edit function.
Save (F9) – Saves the details on the current data entry screen. If you forget to save before you change screens the program will remind you.
Cancel (Ctrl+Z) – Cancels any changes made to current Data Entry screen as long as F9 has not been pressed. Useful when you accidentally make changes and can’t remember what was there previously.
Refresh (Ctrl+F) – Re-loads the current information in again from the data file. Theoretically useful but practically never used.
Save Mult. Barcodes (F10) – If you have purchased several copies or a class set of the same resource and they will be stored in the same location, you can use this function to very quickly add the several barcode entries. To use this function you need to be careful that you have sequential barcodes and that the accession numbers change sequentially (parallel) along with the barcodes.
ie. First item barcode is BC10012 and accession number is 05-10234 to use the Save Multiple function the next item would need to be BC10013 and acc no. 05-10235… let’s say there were 10 copies to be added the last would be BC10022 and acc no. 05-10244. All details entered in the first item (order no., invoice no., date, supplier etc) would be duplicated for subsequent records.
Move Barcode (Ctrl+B) – This is handy when you discover you have added a barcode to the wrong record or you just want to move one (or more) barcodes from an old copy of a record to another record (ie. you are moving a second copy of the resource to a new location and have used the Ctrl-O option to make a new record…If you’ve ever tried to do either of these operations you’ll know why we’ve added this option!) To use it, call up the record you want the barcode to be attached to on the Catalogue tab in data entry, highlight it then Click Record and Move Barcode (or Ctrl+B) then zap or type in the barcode… done.
View Cat. Details (Ctrl+D) – At any stage while working on a record you can press Ctrl+D to pop up a screen that contains all the cataloguing details of the record currently being edited.
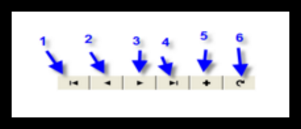
Navigation Bar… (see Record Drop Menu above for descriptions)

- First Record (Ctrl+F11)
- Previous Record <F11>
- Next Record <F12>
- Last Record (Ctrl+F12)
- Add a new record<F2>
- Delete current record <F3>
- Edit current record <F5>
- Save current record<F9>
- Refresh View (Ctrl+F) (Yes… that’s F… I didn’t miss the number!)
Special Buttons…
Point to buttons in the LibCode Suite and you’ll see a popup description of what they will do!

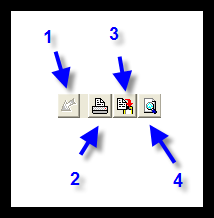
- Undelete button
- Print form or report generator (depending what screen you are on)
- Copy record (Ctrl+O) – Makes a duplicate record so you can adjust details for a new entry. This is not for multiple copies of a resource… it should only be used if a copy of a resource is to be stored in a different shelf location. eg. three copies of the Diary of Anne Frank could be shelved in three different places to encourage readers… Fiction, Diaries, History which would warrant three different catalogue entries. Copy Record Ctrl+O makes this nice and easy. Look up the original entry on the Catalogue tab then go into Cat. Detail tab and press Ctrl+O to make a copy of the current record as a new entry.
- View record details / print preview
Tabs on the screens…
Tabs can be accessed by either clicking on them or using a combination of ALT+ the underlined letter.
Example:

- To access the Catalogue tab in Data Entry you can either click on the tab or use a combination of Alt+A. All tab screens have this function, look for the underlined letter as your cue.
- To access the Subjects tab you can click it or press Alt+S (makes data entry much quicker).
Using Pop-up Calendars…
- When ever a date is required you will encounter the
 button.
 - When you click the
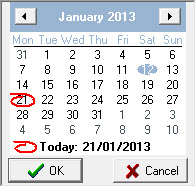
 button a pop-up calendar will appear.

- To move from one month to another sequentially click on the t or u.
- To pick the month you want from a drop down list click on the month then choose from the list.
- If you need to move between years click on the year and you will be able to scroll up or down.
Resorting Data…
Many of the reports and data tables can be resorted by clicking on the top of a column.

1. The list of resources above is currently sorted by Title.
- By clicking on the Site column header the resources can be sorted in shelf list order.
- The BOLD heading indicates the current method used for sorting.
2. If there are any Column headers with an * (asterisk) then these are the only columns that can be used to resort data.

Some data display views like the Current Loans report view (displayed below) have all columns click sortable…although you won’t see any asterisks, the column header will still turn bold to indicate which sort is currently active.

It’s definitely worth looking around the screens with your mouse for popup hints and shortcut keys to speed up things you need to do regularly… we have had lots of suggestions over the years from data entry speedsters and we’ve added plenty of shortcuts!
