Perfect Data is easy to stocktake…so, you might need to do some cleaning up of your database before you start a stocktake.
RULE No. 1. – Backup before you do Bulk Updates!
RULE No. 2. – If you have a big data edit job to do… contact the LibCode Office to check if there is a quick way to do the job!
Good quality Shelf List details are the key here. When I say Shelf List details we are talking about:-
Department, Site, Location, Classification Number and Main Entry (M.E. is the three letters on the Spine label… who knows WHY it is called “Main Entry” but that it is the technical terminology). GMD is worth a look too because there is usually a bit of inconsistency between GMD and Location that makes resources hard to find.
Here’s what we suggest you do to get your database in good shape:
1. Do a Collection Statistics report: (Utilities > Reports > Collection Statistics…)
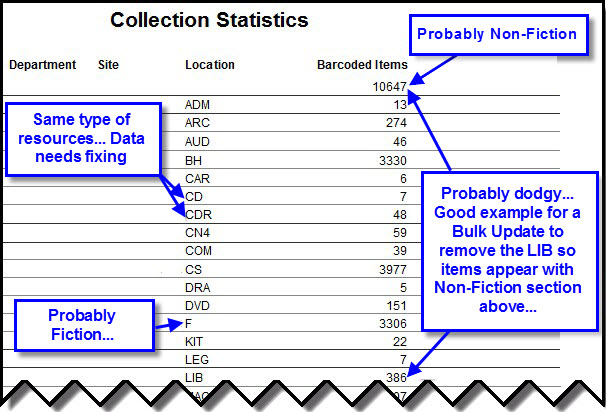
Here is an example report with some issues that need some attention:
-
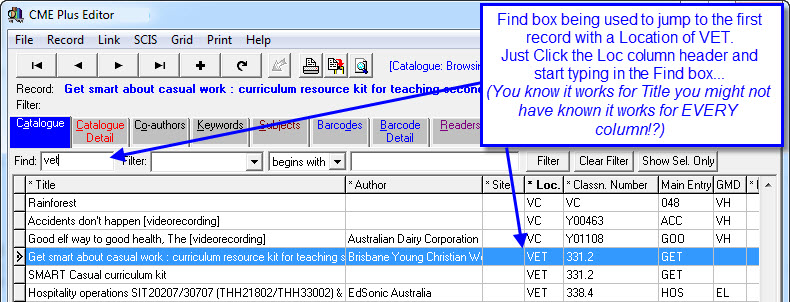
- Notice the 7 CD resources? They should be CDR and that’s a good example of when you just jump into Data Entry, Click on the Location column header to sort the data in Location order and type CD in the Find box to jump to the first record that needs fixing…
- Shift-F12 (Next in List function) is your friend when it comes to jumping back to the next record after where the item was BEFORE you changed it! (Check it out you will use it a LOT as you clean up data!)
- Notice the 386 LIB location records? They should not have LIB in the Location field in this collection… after checking these items in Data Entry using the Filter – Location – Equal to – LIB function to look at the items I see that they are actually Non-Fiction items with Classification numbers and just have an extra LIB added to the Location field.
- This is a prime example for a Bulk Update to change all items with a Location – Lib to Lib… Replace the Location with – No Location and all is well. See Catalogue Update instructions for a more detailed description of the bulk update process… Be Careful!
- Notice the 7 CD resources? They should be CDR and that’s a good example of when you just jump into Data Entry, Click on the Location column header to sort the data in Location order and type CD in the Find box to jump to the first record that needs fixing…
2. Jump in to Data Entry and use the Find box on various columns to find and fix data:
-
- You can leave the Collection Statistics report on the screen and use Alt-Tab to jump into Data Entry to clean up data you find to be dodgy in the report OR just print the report and work your way through it.

3. Re-arrange columns in Data Entry / Catalogue tab to make data checking easier:
The order of the columns displayed in the Catalogue tab of Data Entry is not fixed. You can move the columns around to make it easier to check data and even to create reports!
-
- The little Printer button pops up a Report Generator that allows you to print based on what you have selected and the grid layout you have setup
- Use Grid > Save configuration to keep a copy of your custom layouts!
- Left Click and Hold button down then drag to move columns…
- Closing Data Entry will reset grid layout. If you Saved a configuration you can load it via Grid > Load…
- The little Printer button pops up a Report Generator that allows you to print based on what you have selected and the grid layout you have setup
4. Use multi-select functions on Data grid to highlight dodgy items:
Make a Quick Edit list…
- IF you hold down the CTRL button as you scroll down your data, you can click on individual records to highlight them. Keep the CTRL button down and you can keep selecting or de-selecting more records.
- Once you have gone through and found a bunch of dodgy records, you can click the Show Sel. Only button to hide all the non-selected records and print a report of only the ones you had highlighted.
- Try this after clicking on the Site column header to sort data in Shelf List order… usually there’ll be some nasties at the start (with no Site, Location, Classification No. or M.E.) and then you’ll find more between sections… (between Non-Fiction and Junior Fiction, Between Junior Fiction and Fiction etc…)
Create a Report for checking…
- Once you have highlighted a bunch of dodgy records and it’s time to create a report! Just move the columns around to be exactly where and how wide you want them to be and click Print.
- Don’t forget to use the Save Configuration function under Grid to keep a copy of your layout to use later… this does not save the selection criteria OR the highlighted records… just the layout of the grid.
5. Use Update function in Utilities to sort out big editing tasks:
As you look around your data you may find chunks of data that need adjusting. If you can describe the records in a way that makes them unique (eg. They are the ONLY records that have LIB in the Location field) then you can probably fix them in one swoop.
Bulk Update is the function… it’s a little scary the first hundred or so times but once you got it sorted it’s great! (Here’s an example of a Location Bulk Data Update)
