Libcode Libcode

  • Home
  • LibCode Index
  • Contact
Home / 10 Stocktake / 10.09 Using Files to Add to your Stocktake

10.09 Using Files to Add to your Stocktake

Stocktake data can be collected using a number of non-networked computers / laptops using either the Utilities > Setup > Buffer file OR by opening Notepad and scanning in the resource barcodes.  The file is then saved and added to the Stock file by using the File Append to inload the saved *.txt or *.buf file.

This can prove very handy when you have a number of people assisting with your stocktake.  Each person is allocated a specific area to stocktake.  Their file is saved and imported at a later date by the stocktake ‘co-ordinator’.  The date and time each section is inloaded can be recorded using the Stocktake Checksheets and then you can create Reports and View each specific area.

Arrow

  1. Save your files in one folder so you can find them easily.
  2. Always call the file something descriptive i.e. usually the location where you collected the data.
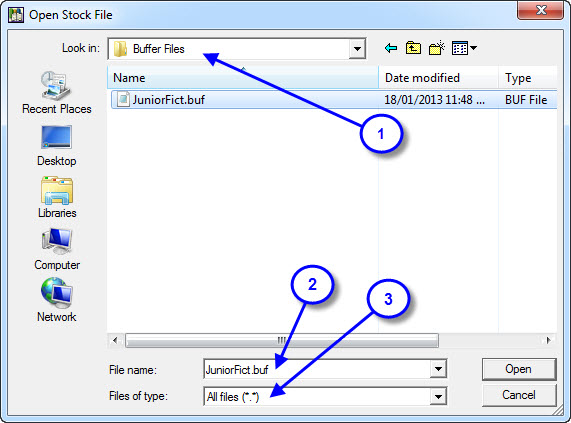
  3. When using the File Append option make sure you look for All Files.  This screen defaults to *.txt files so if you created your file using the Utilities > Setup > Buffer file option the file will be a *.buf format and it will not appear on this list until you change to All Files.

Setting up a Laptop to collect Stocktake Data:

Using a Laptop to create a text file.  This will allow you to scan in the barcodes (a Barcode Scanner with a USB connection will be needed) and then add this file to your stocktake on the main library computer.

    1. Connect your barcode scanner to the laptop.
    2. Create a folder on the C: or D: called Stocktake and have a USB memory stick handy.
    3. Open up Notepad by clicking on START > Accessories > Notepad.
    4. Scan in the barcodes for a particular area eg. Junior Fiction A – L (Get some kind of sequence going).
    5. Once you have finished scanning the barcodes for this area click on FILE / SAVE AS and save the file to the Stocktake folder as a text file.  Name the file so you know what it is eg JF20101207A-L.TXT
    6. When the file has been saved to the hard drive save it again, this time to the USB drive.
    7. Take the USB stick to the main library computer and open up Circulation > Stocktake > File Append.  Locate the USB drive and the relevant file and click Open.  If you can’t find it on your drive click the drop down arrow in the Files of Type field and select ALL FILES.
    8. Now click the Append button and you will be given confirmation of how many barcodes have been added.
    9. Proceed with the stocktake as per the Stocktake Instruction Check Sheet.
10 Stocktake

Related Articles

  • 10. Stocktaking with LibCode Suite
  • 10.01 Step by step guide to doing a Stocktake
  • 10.02 Stocktaking – Tips & Warnings
  • 10.03 Cleaning up Data for a Stocktake

Categories

  • 1301 Overview
  • 901.03 The Modules
  • 702 Getting Started
  • 103 LibCode Suite Menu
  • 704 Enquiry
  • 1605 Data Entry
  • 305.03 Editing Resource
  • 305.01 Adding a New Resource
  • 405.09 Linking resources
  • 205.10 Adding to the Thesaurus
  • 106 Finding a Classification Number
  • 1507 Circulation
  • 307.06 Extending Loans
  • 407.07 Reports
  • 107.08 Reservations
  • 407.13 Borrowers
  • 007.14 Groups
  • 507.07.04 Returned Loans
  • 207.07.05 Unreturned Loans
  • 1108 Utilities
  • 308.01 Inload-Outload
  • 708.02 Backup-Restore
  • 1108.06 Updating
  • 1008.07 Reports
  • 908.08 Setup
  • 508.06.01 Catalogue
  • 108.06.02 Barcode Record Bulk Updating
  • 808.06.06 Updating Circulation
  • 608.06.06.08 Synchronising Borrowers and Rolling Over Student Data
  • 208.06.07 Culling Records
  • 508.08.01 Authority Files
  • 508.08.03 Circulation Options
  • 408.08.03.01 Loan Period, Loan Extensions & Due Date Overview
  • 109 Junior HYG (Optional)
  • 1810 Stocktake
  • 511 SCIS & CMEWeb Uploads
  • 512 Regular Tasks
  • 213 Support Options
  • 814 Installation, Upgrades, etc

Most Viewed

  • 02.03 Installation Requirements for the Libcode Suite 256
  • 01 Overview – LibCode 6.7.9.0 240
  • 02.02 Methods of Installation 191
  • 02. Getting Started 177
  • 02.01 Before installing LibCode Suite 160

Social

Article Categories

01 Overview (13) 01.03 The Modules (9) 02 Getting Started (7) 03 LibCode Suite Menu (1) 04 Enquiry (7) 05 Data Entry (16) 05.01 Adding a New Resource (3) 05.03 Editing Resource (3) 05.09 Linking resources (4) 05.10 Adding to the Thesaurus (2) 06 Finding a Classification Number (1) 07 Circulation (15) 07.06 Extending Loans (3) 07.07 Reports (4) 07.07.04 Returned Loans (5) 07.07.05 Unreturned Loans (2) 07.08 Reservations (1) 07.13 Borrowers (4) 08 Utilities (11) 08.01 Inload-Outload (3) 08.02 Backup-Restore (7) 08.06 Updating (11) 08.06.01 Catalogue (5) 08.06.02 Barcode Record Bulk Updating (1) 08.06.06 Updating Circulation (8) 08.06.06.08 Synchronising Borrowers and Rolling Over Student Data (6) 08.06.07 Culling Records (2) 08.07 Reports (10) 08.08 Setup (9) 08.08.01 Authority Files (5) 08.08.03 Circulation Options (5) 08.08.03.01 Loan Period, Loan Extensions & Due Date Overview (4) 09 Junior HYG (Optional) (1) 10 Stocktake (18) 11 SCIS & CMEWeb Uploads (5) 12 Regular Tasks (5) 13 Support Options (2) 14 Installation, Upgrades, etc (8)

Libcode

Knowledge Base, Frequently Asked Questions, forums integration and much much more.

Flatbase by NiceThemes © 2025. — Powered by WordPress.